REST API Call
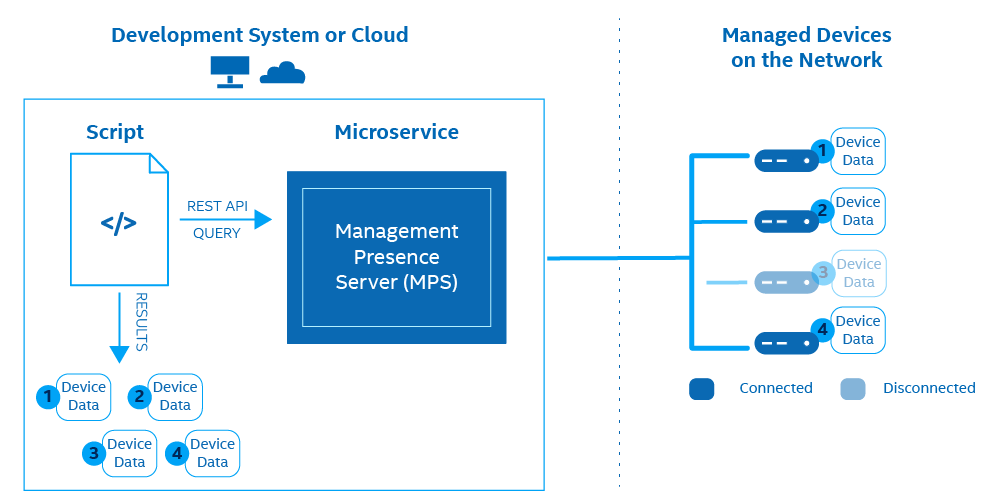
This tutorial demonstrates how to generate a JWT token for Authorization and construct a API call for Getting Devices using Node.js. This method will retrieve information about all devices, including device GUIDs.
Figure 1: API Call to Get All Devices
Important
Successfully deploy the Management Presence Server (MPS) and Remote Provisioning Server (RPS) and connect an Intel® vPro device to MPS before constructing the API call. Start here* to install microservices locally with Docker.
What You'll Need
Hardware
A minimum network configuration must include:
- A Development system with Windows® 10 or Ubuntu 18.04 or newer
- An Activated and Configured Intel® vPro device as the managed device
Software on the Development System
- MPS
- RPS
- Node.js LTS 12.x.x or newer
- Visual Studio Code or any other IDE
What You'll Do
The following sections describe how to:
- Generate a new JWT for Authorization
- Construct an API Call to MPS for Devices
- View Device GUIDs
Generate a JWT
Create a New File
Note - MPS API Authorize Method
See the Authorize Method in the API Documentation for the structure and other requirements of the Authorize API call used in the following to generate a JWT.
- Navigate to a file directory of your choice.
- Create and open a new JavaScript file with a name of your choice. In this guide, we will refer to it as generateJWT.js*.
- Copy and paste the example code below.
-
Update the values of the
username,password, andhostnamekeys.Example POST - generateJWT.js
const https = require('https')
process.env['NODE_TLS_REJECT_UNAUTHORIZED'] = 0 //For testing withself-signed certs, remove for production
let data = JSON.stringify({
    'username': 'standalone', //Replace with MPS_WEB_ADMIN_USER from .env file or mpsweb stored secret
    'password': 'G@ppm0ym' //Replace with MPS_WEB_ADMIN_PASSWORD from .env file or mpsweb stored secret
})

const options = {
    hostname: 'localhost', //Replace 'localhost' with IP Address or FQDN
    path: '/mps/login/api/v1/authorize',
    method: 'POST',
    headers: {
        'Content-Type': 'application/json'
    }
}

const req = https.request(options, (res) => {
    res.setEncoding('utf8')
    res.on('data', d => {
        console.log(d)
    })
})

req.on('error', (e) => {
    console.error(e)
})

// Write data to request body
req.write(data)
req.end()
Execute the REST API
- Open a Terminal or Command Prompt to execute the call.
- Navigate to the directory you saved the generateJWT.js file.
-
Run the code snippet using node.
node generateJWT.jsExample
Example Response:
{"token":"eyJhbGciOiJIUzI1NiIsInR5cCI6IkpXVCJ9.eyJpc3MiOiI5RW1SSlRiSWlJYjRiSWVTc21nY1dJanJSNkh5RVRxYyIsImV4cCI6MTYyMDE2OTg2NH0.GUib9sq0RWRLqJ7JpNNlj2AluuROLICCfdZaQzyWy90"}
Construct API Call for Devices
Note - MPS API GetDevices Method
See the GetDevices Method in the API Documentation for the structure and other requirements of the GetDevices API call used in the following to generate a JWT.
- Create and open a new JavaScript file with a name of your choice. In this guide we will refer to it as myDevices.js*.
- Copy and paste the example code below.
- Update the value of the
hostnamekey to the IP Address or FQDN. -
Replace <Your-JWT-Token> with the JWT you generated from the Authorize API Call.
Example GET - myDevices.js
const https = require('https') process.env['NODE_TLS_REJECT_UNAUTHORIZED'] = 0 //For testing with self-signed certs, remove for production const options = { hostname: 'localhost', //Replace 'localhost' with IP Address or FQDN path: '/mps/api/v1/devices', method: 'GET', headers: { 'Authorization': 'Bearer <Your-JWT-Token>' //Replace <Your-JWT-Token> with your generated JWT Token } } const req = https.request(options, (res) => { res.setEncoding('utf8') res.on('data', d => { console.log(d) }) }) req.on('error', (e) => { console.error(e) }) req.end() -
Run the code snippet using node.
node myDevices.jsImportant
This is one way to retrieve a device's GUID in the host field. For amt path methods (i.e., Power Actions, Audit Logs, etc), the device GUID is required as part of the GET path. Save this value if you want to try other MPS methods. Other ways to retrieve a GUID can be found here.
Example
Example Terminal Output:
Example JSON Pretty Print:[{"connectionStatus":1,"hostname":"DESKTOP-R2225SQ", "guid":"d92b3be1-b04f-49de-b806-54b203054e9d","metadata": {"guid":"d92b3be1-b04f-49de-b806-54b203054e9d","hostname":"DESKTOP-R2225SQ","tags": []}}][ { "connectionStatus": 1, "hostname": "DESKTOP-R2225SQ", "guid": "d92b3be1-b04f-49de-b806-54b203054e9d", "metadata": { "guid": "d92b3be1-b04f-49de-b806-54b203054e9d", "hostname": "DESKTOP-R2225SQ", "tags": [] } } ]
Other Methods
The sample POST and GET code snippets above can be adapted for other MPS and RPS methods. To test other methods, see:
Modify the tutorial POST and GET templates to implement other MPS REST APIs by changing these values:
- path
- method
- payload (stored in the variable 'data', if POST method)
Explore the UI Toolkit
In addition to REST API calls, the Open AMT Cloud Toolkit provides a reference implementation console. Add manageability features to the console with prebuilt React components, such as Keyboard, Video, and Mouse (KVM).
