Build & Run RPC (Manual)
In addition to using GitHub Actions to obtain a binary, the RPC binary can also be manually built. The steps below walk through how to build RPC on Windows® 10, Ubuntu* (18.04 or 20.04), and CentOS 7/8.
Required Software
Additionally, if using Windows® 10:
- Microsoft Visual Studio*: 2019 or newer version of Visual Studio Community/Professional
- Make sure to install the Desktop development with C++ package at time of installation or via the 'Get tools and extensions' menu within Microsoft Visual Studio*.
The steps below assume the following directory structure where rpc is the clone of the rpc repository, vcpkg is a clone of the VCPKG tool source and build is the RPC build directory. Both vcpkg and build directories will be created in later steps.
\rpc
  |__vcpkg
  |__build
Clone the Repository
-
On your development system, navigate to a directory of your choice to clone and build RPC.
-
Clone the RPC repository.
git clone --branch v2.0.0 https://github.com/open-amt-cloud-toolkit/rpc.git && cd rpc
Install Prerequisites and Build RPC
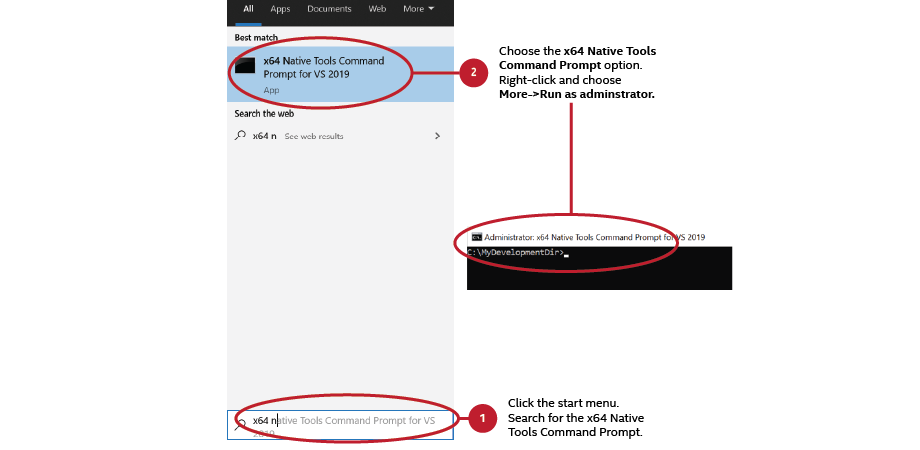
Open 'x64 Native Tools Command Prompt for VS 20XX' on your development system. This is NOT a regular Windows Command Prompt. This specific tool is used for compiling the RPC executable.
Build VCPKG and C++ REST SDK
-
In the
rpcdirectory, clone the VCPKG repository. Vcpkg is a C/C++ Library Manager for Windows that was created by Microsoft. Find out more about it here.git clone --branch 2020.11-1 https://github.com/microsoft/vcpkg.git && cd vcpkg -
Build vcpkg.exe using the following command.
bootstrap-vcpkg.bat -
Install C++ REST SDK. This can take anywhere from 8 - 15 minutes depending on download speeds and installation times.
vcpkg install cpprestsdk[websockets]:x64-windows-static
Build RPC
-
Return to the
rpcdirectory and create a newbuilddirectory.cd .. && mkdir build && cd build -
Generate the CMake config.
cmake -DVCPKG_TARGET_TRIPLET=x64-windows-static -DCMAKE_TOOLCHAIN_FILE=../vcpkg/scripts/buildsystems/vcpkg.cmake .. -
Build the RPC executable.
cmake --build . --config ReleaseNote
RPC can also be built in a non-production debug mode rather than release using the following command. The debug mode includes debug symbols.
cmake --build . --config Debug -
Change to
Releasedirectory.cd Release
The following steps are for Ubuntu 18.04, Ubuntu 20.04, or CentOS8.
Build VCPKG and C++ REST SDK
-
To install the required dependencies; enter the following command.
sudo apt install git cmake build-essential curl zip unzip tar pkg-configsudo yum install cmake -
In the
rpcdirectory, clone the Vcpkg repository. Vcpkg is a C/C++ Library Manager for Windows that was created by Microsoft. Find out more about it here.git clone --branch 2020.11-1 https://github.com/microsoft/vcpkg.git && cd vcpkg -
Build vcpkg.exe using the following command.
./bootstrap-vcpkg.sh -
Install C++ REST SDK. This can take anywhere from 8 - 15 minutes depending on download speeds and installation times.
./vcpkg install cpprestsdk[websockets]
Build RPC
-
Return to the
rpcdirectory and create a new 'build' directory.cd .. && mkdir build && cd build -
Generate the CMake config.
cmake -DCMAKE_TOOLCHAIN_FILE=../vcpkg/scripts/buildsystems/vcpkg.cmake -DCMAKE_BUILD_TYPE=Release ..Note
RPC can also be built in a non-production debug mode rather than release using the following command. The debug mode includes debug symbols.
cmake -DCMAKE_TOOLCHAIN_FILE=../vcpkg/scripts/buildsystems/vcpkg.cmake -DCMAKE_BUILD_TYPE=Debug .. -
Build the RPC executable.
cmake --build .
Important
All commands should be executed in the same Terminal. The "export PATH=..." (for CMake and Git), and "scl enable devtoolset-7 bash" (for GCC) are temporary changes which only affect the current Terminal session.
Install Dependencies
-
Download CMake. CMake 3.10.2 is recommended and can be downloaded from here. Other CMake binary versions are available here.
./cmake-3.10.2-Linux-x86_64.sh export PATH=/home/user/Downloads/cmake-3.10.2-Linux-x86_64/bin:$PATH -
Update GCC toolchain.
sudo yum install centos-release-scl sudo yum install devtoolset-7 scl enable devtoolset-7 bash -
Build Git source control system.
sudo yum install curl-devel expat-devel gettext-devel openssl-devel zlib-develperl-CPAN perl-devel
git clone https://github.com/git/git.git
make configure
make
export PATH=/home/user/Downloads/git:$PATH
Build VCPKG and C++ REST SDK
-
In the
rpcdirectory, clone the VCPKG repository. Vcpkg is a C/C++ Library Manager for Windows that was created by Microsoft. Find out more about it here.git clone --branch 2020.11-1 https://github.com/microsoft/vcpkg.git && cd vcpkg -
Build vcpkg.exe using the following command.
./bootstrap-vcpkg.sh -
Install C++ REST SDK. This can take anywhere from 8 - 15 minutes depending on download speeds and installation times.
./vcpkg install cpprestsdk[websockets]
Build RPC
-
Return to the
rpcdirectory and create a new 'build' directory.cd .. && mkdir build && cd build -
Generate the CMake config
cmake -DCMAKE_TOOLCHAIN_FILE=../vcpkg/scripts/buildsystems/vcpkg.cmake -DCMAKE_BUILD_TYPE=Release -DNO_SELECT=ON ..Note
RPC can also be built in a non-production debug mode rather than release using the following command. The debug mode includes debug symbols.
cmake -DCMAKE_TOOLCHAIN_FILE=../vcpkg/scripts/buildsystems/vcpkg.cmake -DCMAKE_BUILD_TYPE=Debug -DNO_SELECT=ON .. -
Build the RPC executable
cmake --build .
Run RPC
For additional information on possible arguments when invoking RPC, see Command Examples.
The following example command shows how to activate and configure an Intel® AMT device using a pre-defined profile on your local network.
- After building the RPC, copy the executable to the managed device.
- Run the RPC.
Important
On a Windows® 10 system, the Command Prompt must be run as Adminstrator.
rpc --url wss://localhost/activate --nocertcheck --cmd "-t activate --profile profile1"
sudo ./rpc --url wss://localhost/activate --nocertcheck --cmd "-t activate --profile profile1"
Note
The --nocertcheck flag allows for the use of self-signed certificates for development purposes. Find more information here
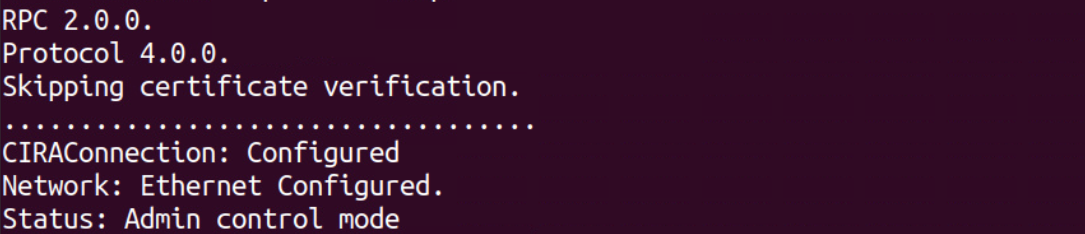
Example Success Output: