Build & Run RPC
Developed in Go* programming language, the Remote Provisioning Client (RPC) application runs on the managed device and communicates with the Remote Provisioning Server (RPS) microservice on the development system. The RPC and RPS configure and activate Intel® AMT on the managed device. Once properly configured, the remote managed device can call home to the Management Presence Server (MPS) by establishing a Client Initiated Remote Access (CIRA) connection with the MPS. See Figure 1.
Beta Version Instructions Ahead
This version of the RPC application contains functional enhancements. See Release Notes.
However, it is a Beta version release.
If you are unable to complete the installation below or you simply require an older release of the RPC, see Open AMT Cloud Toolkit 2.0:
Production Environment
In a production environment, RPC can be deployed with an in-band manageability agent to distribute it to the fleet of AMT devices. The in-band manageability agent can invoke RPC to run and activate the AMT devices.
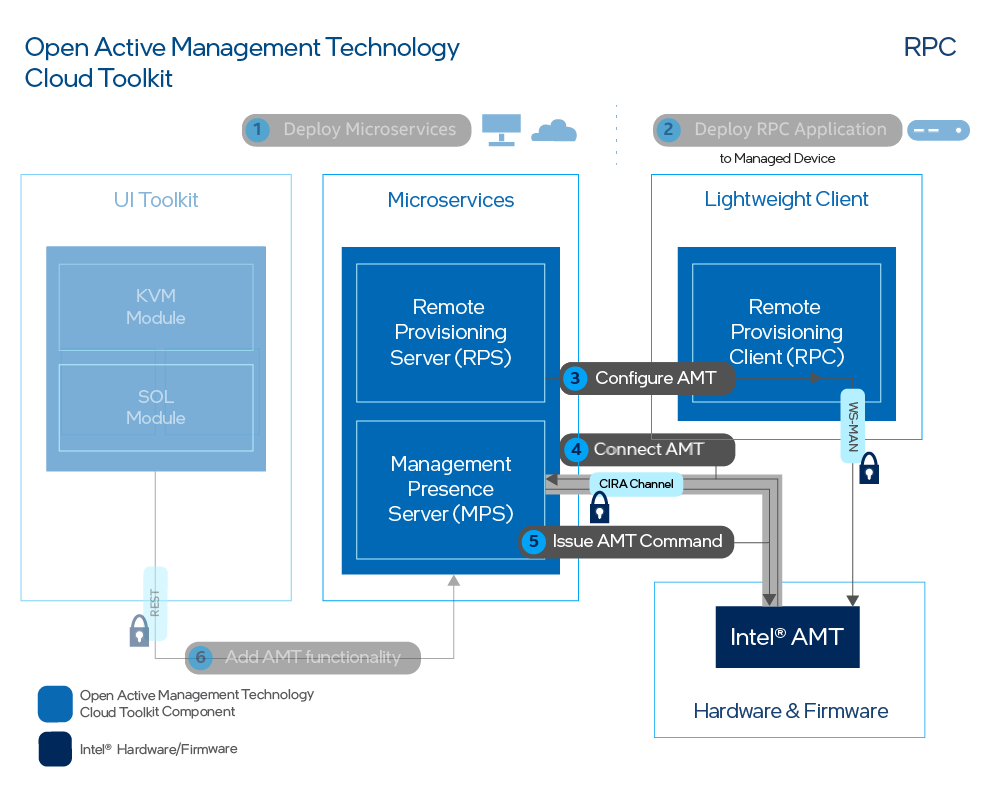
Figure 1 Details
The RPC on a managed device communicates with the Intel® Management Engine Interface (Intel® MEI, previously known as HECI) Driver and the Remote Provisioning Server (RPS) interfaces. The Driver uses the Intel® MEI to talk to Intel® AMT. The RPC activates Intel® AMT with an AMT profile, which is associated with a CIRA configuration (Step 3). The profile, which also distinguishes between Client Control Mode (CCM) or Admin Control Mode (ACM), and configuration were created in Create a CIRA Config or Create an AMT Profile. After running RPC with a profile, Intel® AMT will establish a CIRA connection with the MPS (Step 4) allowing MPS to manage the remote device and issue AMT commands (Step 5).
Prerequisites
Before installing and building the RPC, install:
- Go* Programming Language
-
tdm-gcc (On Windows* only)
To install prerequisites on Linux*:
1.) See Go's Download and Install.
2.) Choose and download a distribution appropriate for your managed device and operating system (e.g., tar.gz).
3.) Extract the archive in the location indicated in Go's installation instructions.
4.) Follow the remaining instructions.
To install prerequisites on Windows:
Go Programming Language
1.) See Go's Download and Install.
2.) Choose and download a distribution appropriate for your managed device and operating system (e.g., msi).
3.) Run the downloaded file and follow prompts to install.
tdm-gcc
1.) See tdm-gcc.
2.) Choose a version and download the .exe.
3.) Run the downloaded file and follow prompts to install. For a new installation, choose Create and accept all default installation options.
To verify Go and tdm-gcc installations:
- Open a Terminal or Command Prompt:
For Windows only:
go versiongcc -v - Confirm the version numbers.
Get the RPC
If you have already cloned the toolkit repository as described in Set Up, change to the cloned rpc-go directory and see Build the RPC.
If you want to clone only the rpc-go repository, follow the steps below.
To clone the repository:
-
Open a Terminal or Command Prompt and navigate to a directory of your choice for development:
git clone https://github.com/open-amt-cloud-toolkit/rpc-go --branch v2.0.0 -
Change to the cloned
rpc-godirectory:cd rpc-go
Build the RPC
To build the executable:
If you are building on a development system, copy the resulting executable to the managed device.
-
Open a Terminal (Linux) or Powershell/Command Prompt as Administrator (Windows):
sudo apt install build-essentialgo build -o rpc ./cmdgo build -o rpc.exe ./cmddocker build -f "Dockerfile" -t rpc-go:latest .Note
The image created with the Docker instruction above is only suitable for Docker on a Linux host.
RPC Go Build Warnings
You may see the
go buildcommand output a series of warnings similar to below. The binary still successfully built. These warnings show due to LMS, which is based on C, and it's interactions with AMT firmware. In the future, this may change.$ go build -o rpc ./cmd # rpc/internal/amt In file included from internal/amt/commands.go:14: internal/amt/../../microlms/heci/LMEConnection.c: In function 'LME_Init': internal/amt/../../microlms/heci/LMEConnection.c:129:24: warning: passing argument 1 of 'ILibSpawnNormalThread' from incompatible pointer type [-Wincompatible-pointer-types] 129 | ILibSpawnNormalThread((voidfp)(&LME_Thread), module); ... -
Copy the executable to a managed device.
-
Confirm a successful build:
sudo ./rpc version.\rpc versionsudo docker run --device=/dev/mei0 rpc-go:latest version
Run RPC to Activate and Connect the AMT Device
The toolkit provides a reference implementation called the Sample Web UI to manage the device. After running device activation instructions below, your device will be listed on the Devices tab in the Sample Web UI.
To run the application and connect the managed device:
-
After building the RPC, copy the executable to the managed device.
-
On the managed device, open a Terminal (Linux) or Powershell/Command Prompt as Administrator (Windows).
-
Navigate to the directory containing the RPC application.
-
Running RPC with the activate command configures or provisions Intel® AMT. It will take 1-2 minutes to finish provisioning the device. In the instruction below:
- Replace [Development-IP-Address] with the development system's IP address, where the MPS and RPS servers are running.
- Replace [profile-name] with your created profile in the Sample Web UI. The RPC application command line parameters are case-sensitive.
sudo ./rpc activate -u wss://[Development-IP-Address]/activate -n --profile [profilename].\rpc activate -u wss://[Development-IP-Address]/activate -n --profile [profilename]sudo docker run --device=/dev/mei0 rpc-go:latest activate -u wss://[Development-IP-Address]/activate -n --profile [profilename]Note - RPC Arguments
See more about the flag and other arguments.
Transition Activated Device
To learn how to use the rpc application to transition an already activated (provisioned) Intel vPro® Platform, see Transition Activated Device.
Success
Example Output after Activating and Configuring a device into ACM:

Figure 2: Example output after configuration Troubleshooting
Run into an issue? Try these troubleshooting steps.