Amazon Elastic Kubernetes Service (EKS)
This tutorial demonstrates how to deploy the Open AMT Cloud Toolkit on a Kubernetes cluster using EKS. To perform a simpler test deployment, use a single-mode cluster locally. See Kubernetes (K8s).
Amazon EKS offers serverless Kubernetes, an integrated continuous integration and continuous delivery (CI/CD) experience, and enterprise-grade security and governance. Learn more about EKS here.
Prerequisites
Get the Toolkit
-
Clone the Open AMT Cloud Toolkit.
git clone https://github.com/open-amt-cloud-toolkit/open-amt-cloud-toolkit --branch v2.3.4
Create a New EKS Cluster
-
Follow steps for aws configure to finish configuration of AWS CLI.
-
Follow steps to Create a key pair using Amazon EC2 to create a SSH key for accessing the cluster.
-
Create a new EKS cluster and supporting components.
eksctl create cluster --name <cluster-name> --region <region> --with-oidc --ssh-access --ssh-public-key <ssh-keypair-name> --managedWhere:
- <cluster-name> is the name of the new EKS cluster.
- <region> is the AWS region to deploy the stack (Ex:
us-west-2). - <ssh-keypair-name> is the name of the SSH key from the previous step.
Create Postgres DB in RDS
-
Create a Postgres DB by following the steps for Creating an Amazon RDS DB instance.
Make sure to set the following configuration settings:
Field Set to Virtual private cloud (VPC) Choose the VPC created from your cluster. It should follow the format: 'eksctl-<cluster-name>-cluster/VPC' Public access Yes. In the next steps, we will create Security rules to limit access. VPC security group Choose existing Existing VPC security groups default
Configure Virtual Private Cloud (VPC) for access
- Go to RDS home.
- Select 'Databases' from the left-hand side menu.
- Select your created database (Ex: database-1).
- Under Security in Connectivity & security, click on the VPC under VPC security groups (Ex:
default (sg-01b4767ggdcb52825)). - Select Inbound rules.
-
Select Edit inbound rules.
Add Two New Rules
Rule One:
- Select Add rule.
- Under 'Type' select PostgresSQL.
- Under 'Source' select My IP.
Rule Two:
- Select Add rule.
- Under 'Type' select PostgresSQL.
- Under 'Source' select Custom.
- In the search box, select the security group starting with the label 'eks-cluster-sg'.
-
Select Save rules.
Create Databases and Schema
-
Use the database schema files to initialize the hosted Postgres DB in the following steps.
Note
The following commands will prompt for the database password you chose here.
Where:
- <SERVERURL> is the location of the Postgres database (Ex:
database-1.jotd7t2abapq.us-west-2.rds.amazonaws.com). - <USERNAME> is the username for the Postgres database.
- <SERVERURL> is the location of the Postgres database (Ex:
-
Create the RPS database.
psql -h <SERVERURL> -p 5432 -d postgres -U <USERNAME> -W -c "CREATE DATABASE rpsdb" -
Create tables for the new 'rpsdb'.
psql -h <SERVERURL> -p 5432 -d rpsdb -U <USERNAME> -W -f ./open-amt-cloud-toolkit/data/init.sql -
Create the MPS database.
psql -h <SERVERURL> -p 5432 -d postgres -U <USERNAME> -W -f ./open-amt-cloud-toolkit/data/initMPS.sql
Connect to EKS Instance
Ensure your kubectl is connected to the EKS cluster you wish to deploy/manage.
-
Provide your region and cluster name.
aws eks update-kubeconfig --region <region> --name <cluster-name>Where:
- <cluster-name> is the name of your EKS cluster.
- <region> is the AWS region where the cluster is (Ex:
us-west-2).
Create Secrets
1. MPS/KONG JWT
This is the secret used for generating and verifying JWTs.
kubectl create secret generic open-amt-admin-jwt --from-literal=kongCredType=jwt --from-literal=key="admin-issuer" --from-literal=algorithm=HS256 --from-literal=secret="<your-secret>"
Where:
- <your-secret> is your chosen strong secret.
2. KONG ACL for JWT
This configures KONG with an Access Control List (ACL) to allow an admin user open-amt-admin to access endpoints using the JWT retrieved when logging in.
kubectl create secret generic open-amt-admin-acl --from-literal=kongCredType=acl --from-literal=group=open-amt-admin
3. MPS Web Username and Password
This is the username and password that is used for requesting a JWT. These credentials are also used for logging into the Sample Web UI.
kubectl create secret generic mpsweb --from-literal=user=<your-username> --from-literal=password=<your-password>
Where:
- <your-username> is a username of your choice.
-
<your-password> is a strong password of your choice.
Important - Using Strong Passwords
The password must meet standard, strong password requirements:
- 8 to 32 characters
- One uppercase, one lowercase, one numerical digit, one special character
4. Database connection strings
Warning - Using SSL/TLS with AWS RDS
This tutorial uses the connection string setting of 'no-verify' for ease of setup. AWS requires additional work and provides intermediate and root certs for using SSL/TLS with a RDS DB instance. For production, it is recommended to use a SSL connection.
Find more information at Using SSL with a PostgreSQL DB instance and also at Updating applications to connect to PostgreSQL DB instances using new SSL/TLS certificates.
-
Configure the database connection strings used by MPS, RPS, and MPS Router.
Where:
- <USERNAME> is the username for the Postgres database.
- <PASSWORD> is the password for the Postgres database.
- <SERVERURL> is the url for the AWS-hosted Postgres database (Ex:
database-1.jotd7t2abapq.us-west-2.rds.amazonaws.com).
-
Create RPS connection string secret.
kubectl create secret generic rps --from-literal=connectionString=postgresql://<USERNAME>:<PASSWORD>@<SERVERURL>:5432/rpsdb?sslmode=no-verify -
Create MPS Router connection string secret.
kubectl create secret generic mpsrouter --from-literal=connectionString=postgresql://<USERNAME>:<PASSWORD>@<SERVERURL>:5432/mpsdb?sslmode=disable -
Create MPS connection string secret.
kubectl create secret generic mps --from-literal=connectionString=postgresql://<USERNAME>:<PASSWORD>@<SERVERURL>:5432/mpsdb?sslmode=no-verify
Update Configuration
Edit values.yaml
-
Open the
values.yamlfile in the./open-amt-cloud-toolkit/kubernetes/charts/directory. -
Remove the annotations section and
service.beta.kubernetes.io/azure-dns-label-namekey in thekong:section. These are Azure-specific implementations.kong: proxy: annotations: # Delete this line service.beta.kubernetes.io/azure-dns-label-name: "<your-domain-name>" # Delete this line -
Save and close the file.
Deploy Open AMT Cloud Toolkit using Helm
-
Deploy using Helm.
helm install openamtstack ./kubernetes/chartsSuccess
NAME: openamtstack
LAST DEPLOYED: Thu Jul 15 11:17:38 2021
NAMESPACE: default
STATUS: deployed
REVISION: 1
TEST SUITE: None
Initialize and Unseal Vault
Danger - Download and Save Vault Keys
Make sure to download your Vault credentials and save them in a secure location when unsealing Vault. If the keys are lost, a new Vault will need to be started and any stored data will be lost.
Tip - Finding the Vault UI External IP Address
The external IP of your Vault UI service can be found by running:
kubectl get services openamtstack-vault-ui
-
Please refer to HashiCorp documentation on how to Initialize and unseal Vault. Stop and return here after signing in to Vault with the
root_token. -
After initializing and unsealing the vault, you need to enable the Key Value engine.
-
Click Enable New Engine +.
-
Choose KV.
-
Click Next.
-
Leave the default path and choose version 2 from the drop down.
-
Click Enable Engine.
Vault Token Secret
-
Add the root token as a secret to the EKS cluster so that the services can access Vault.
kubectl create secret generic vault --from-literal=vaultKey=<your-root-token>Where:
- <your-root-token> is your
root_tokengenerated by Vault.
- <your-root-token> is your
Update commonName in values.yml
-
Get the External-IP for accessing the UI. Note and save the value under 'EXTERNAL-IP'.
kubectl get service openamtstack-kong-proxy -
Update the value for
commonNamein the mps section in thevalues.ymlfile with the External-IP from above. Recall thatvalues.ymlis located in./kubernetes/charts/.mps: commonName: "" # update with External-IP from `kubectl get services` replicaCount: 1 logLevel: "silly" jwtExpiration: 1440 -
Update the stack using helm.
helm upgrade openamtstack ./kubernetes/charts
Verify running pods
-
View the pods. All pods should now be Ready and Running.
kubectl get podsSuccess
NAME READY STATUS RESTARTS AGE mps-69786bfb47-92mpc 1/1 Running 0 4m5s mpsrouter-9b9bc499b-2tkb2 1/1 Running 0 4m5s openamtstack-kong-68d6c84bcc-fp8dl 2/2 Running 0 4m5s openamtstack-vault-0 1/1 Running 0 4m5s openamtstack-vault-agent-injector-6b564845db-zss78 1/1 Running 0 4m5s rps-79877bf5c5-dsg5p 1/1 Running 0 4m5s webui-6cc48f4d68-6r8b5 1/1 Running 0 4m5s -
Check that the MPS Certificate is correct in your browser. Go to your FQDN at port 4433.
https://<Your-AWS-FQDN>:4433 -
Verify the MPS Certificate in your browser has the correct Issuer information and is Issued to your FQDN.
Troubleshoot -
Issued tofield showing NaN or blankIf your certificate is incorrect, the AMT device will not connect to the MPS server. See Figure 1.
Follow the steps below to correct the problem.
Example - Incorrect MPS Certificate
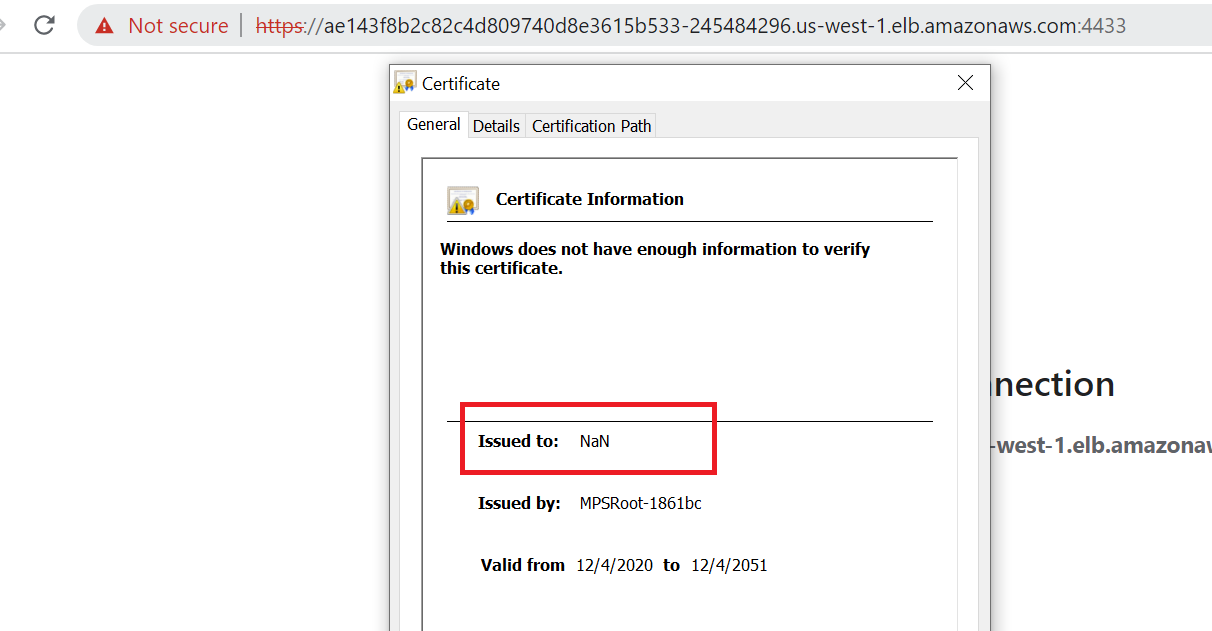
Figure 1: Incorrect Certificate -
Open and Login to Vault UI.
-
Go to
kv/data/MPSCerts/directory. -
Delete the existing MPS Certificate.
-
In a terminal, run the following command.
kubectl rollout restart deployment mps -
A new, correct MPS Cert should be generated.
-
Go back to the webserver in your browser.
https://<Your-AWS-FQDN>:4433 -
Verify the
Issued to:field is no longer NaN/blank and now shows the correct FQDN. -
Continue to Next Steps section.
-
Next Steps
Visit the Sample Web UI using the FQDN name and Continue from the Get Started steps.